App Note #1238 - Cloud Presence Simulator
This App Note describes how to implement a presence simulator controlled from the Cloud. The system consists in a combination of different internet free services as Twitter and IFTTT (www.ifttt.com). An Arduino Ethernet board is used to control a power switch to turn on and turn off a light. This design is intended to show you how the NearBus Connector simplifies the way in which these kind of Internet-based projects can be implemented.
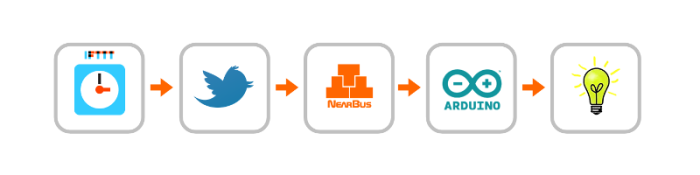
As showed in the last picture the system consists of an Internet configurable clock that sends ON / OFF messages through Twitter to the NearBus connector. The NearBus connector forwards these messages to the Arduino Ethernet board (through Internet) who Turns On and Turns Off a power switch allowing in this way to control the light sequence form any place with a simple browser.
Note: It is important to remark that Twitter in contrast to its traditional use (as message platform) in this case is used as a "text transport channel" to carry the pseudo RESTful string (like to the http protocol).
Required Components
To implement this App Note you will need:
- 1 Arduino Ethernet Board
- 1 Power Relay (5Vdc coil - 110/220Vac 5Amp power side)
- 1 transistor BC548C (or equivalent)
- 1 Diode 1N4148 (or equivalent)
- 1 Resistor ( 2 KOhm 1/4 W)
- 1 Ethernet Internet connection (with a RJ45 cable)
- Difficulty Level: Low-Medium
STEP 1 - Setup a New NearBus Account
To setup a new account in the NearBus Connector, please follow the steps 1 to 6 in the Hello World example www.nearbus.net/hello_world.html. The Step 6 allows you to test the system without connecting the power circuit :)
STEP 2 - Activate the Twitter Channel in NearBus
To activate the Twitter Channel in your NearBus session, you should configure the parameters showed bellow.
To access this configuration table select the TWITTER_CONFIG option in the drop down menu (on the DEVICE CONFIG screen).
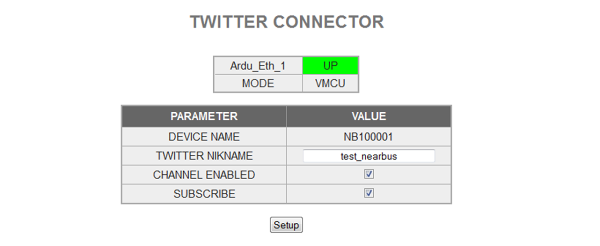
IMPORTANT: It is strongly recommended to define a "New Protected" Twitter account to use it as a communication channel between the IFTTT application and the NearBus Connector. If you do not define this account as "Protected" everybody will be able to follow it and therefore gain access to your NearBus user and password.
Twitter Nikname: Your account name in Twitter.
Channel Enable: Check this option to activate the Tweets reception.
Subscribe: Check this option and the NearBus connector will send a follower request to your Twitter account (you should accept this request in you Twitter account as showed in the next step).
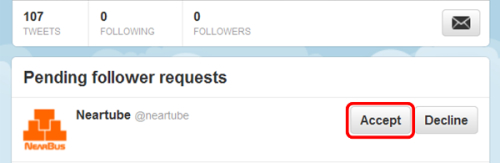
STEP 3 - Accept the NearBus Twitter Request
Accept the request message sent by NearBus in your Twitter account as shown in the following picture.
STEP 4 - Create a New IFTTT task
Note: For this step you should have your own IFTTT account.
The following example shows how to create a cyclic 1 hour sequence (4 steps ON-OFF-ON-OFF of 15 min each):

Ofcourse you can define your specific sequence configuring the "Date & Time" IFTTT trigger in another way.
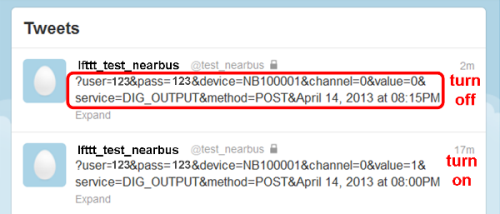
As IFTTT "Action Channel" you should use the Twitter option and configure it with the following RESTful command sequence:
1- Turn ON the light
?user=_user&pass=_password&device=NB1xxxxx&channel=0&value=1&service=DIG_OUTPUT&method=POST&{{CheckTime}}
2- Turn OFF the ligth
?user=_user&pass=_password&device=NB1xxxxx&channel=0&value=0&service=DIG_OUTPUT&method=POST&{{CheckTime}}
Parameters
_user: Your NearBus user (it is what you use to login into the NearBus platform)
_user: Your NearBus password (it is what you use to login into the NearBus platform)
NB1xxxxx: The device ID (NearBus ID) that you are using for this example
Note: the {{CheckTime}} is a dummy parameter used to make all the messages different (because Twitter rejects duplicate messages to avoid spam :)

Note: For more information about how RESTful web communications works please visit www.nearbus.net
STEP 5 - Check the Twitter Messages
Once that you have configured and linked the IFTTT and Twitter account you should begin to receive the IFTTT messages in your Twitter account each 15 min (for this example)
Note: Take into account that IFTTT processes the Triggers each 15 minutes so you will receive messages at this ratio. Although this ratio looks slow, take into account that it runs 24hx365d so the possible applications can be interesting.
STEP 6 - Connect the Power Circuit
If the system is working as expected, you can replace the LED for the power switch in order to get a cool application.
The following picture shows the basic circuit that allows you to control a 110/200VAC power light. This is a very simple and inexpensive to implement circuit.
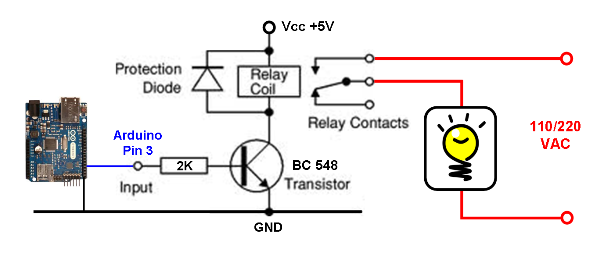
IMPORTANT: Take into account that this circuit works with hazardous voltages so be careful when implementing the power side of this circuit. Remember: check twice, run once :)
Testing More Features
If you want to try more features available in the functions drop-down menu please refer to the HELP section for a detailed description of the NearBIOS features.
If you are interested in knowing more about this App Note please contact us at: info@nearbus.net