App Note #1218 - Hello World
This App Note describes step by step how to configure an Arduino Ethernet board to control a LED from the Cloud, (the "Hello World" example in the microcontroller's world). This trivial example is intended to introduce you the way how the NearBus system works.
There is no PC or gateway involved in this implementation. The Arduino will connect directly to the NearHub Server through the internet access router and you will be able to control it from your web browser.
Required Components
To implement this App Note you will need:
- 1 Arduino Ethernet Board
- 1 LED
- 1 Current limiter Resistor ( 330 Ohms or similar value)
- 1 Ethernet Internet connection (with a RJ45 cable)
- Implementation time: 20 min
- Difficulty Level: Low
STEP 1 - Sing up a new user
Go to the SIGN UP screen and set up a new user. Only the username, email and password are required to setup your new account.

Then login into the NearBus website using your new user and password.
STEP 2 - Define a New Device
From the top menu bar select the NEW DEVICE option to create a new device.
To setup the new device you should configure the followings field in order to define it. Take in account that only the SHARED SECRET field is mandatory (the password). The other fields are optional, so it is not necessary to configure they for this first example.

- Device Name: optional (eg. My Device)
- Location: nothing
- Function: nothing
- Shared Secret: Mandatory (length of 8). It is the same as you should configure in the Arduino (eg. 12345678)
- Callback Function: nothing
- Refresh Rate: nothing (default 1000ms)
Note: When you create a new device, the NearBus system will generate a unique device ID (likeNB1xxxxx) that will be showed in the DEVICE LIST screen (do not confuse it with the DEVICE NAME field !!).
Take in account that you will need to configure this ID in the Arduino's code as explained in the following step.

STEP 3 - Download and Install the NearAgent code library
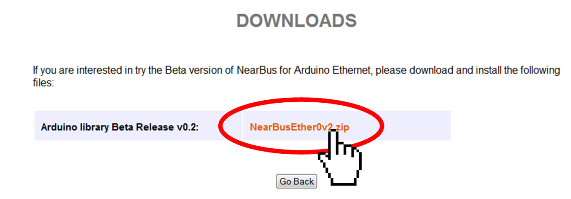
a- Download the Arduino NearBus library from the following link:
DOWNLOAD ARDUINO ETHERNET AGENT

Note: The version numbers and file names are illustrative and can be different from the last release.
Note: This code only include a simple implementation of the NearBIOS features in order to simplify its understanding.
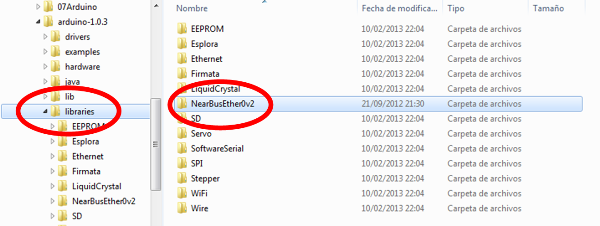
b- Upload it to the Arduino Ethernet board, you only have to unzip the file and copy it into the Arduino library folder (remember to restart the Arduino IDE).

Note: The version numbers and file names are illustrative and can be different from the last release.
IMPORTANT: Remember to check the decompressed library folder in order to avoid double nested folders. Depending on the decompressing option selected you can obtain nested folders (like NearBusEther0v2x/ NearBusEther0v2x/...). In this case you only should install then second-level folder (NearBusEther0v2x/) in your Arduino library in order to avoid an error at compilation time.
c- Load the "Hello World" code from the example section in the IDE menu.

Note: The version numbers and file names are illustrative and can be different from the last release.
STEP 4 - Set the Agent's configuration
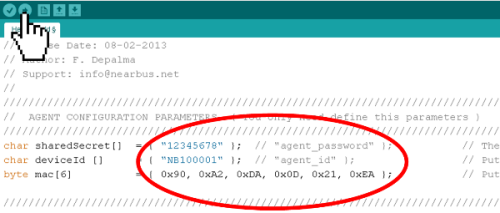
a- Change the configuration settings in the Arduino main code, as showed in the next picture:
- Device_ID: Unique device identifier generated by the system (you can find it in the Device List screen).
- Password: User generated (shared secret).
- Arduino Ethernet MAC: Ethernet MAC Address (you can find it printed in the Arduino Ethernet board).

b- Compile and upload the code "Hello World" to the Arduino Ethernet board.
Important: Because in this example the Arduino will work in VMCU mode, you will not need modify the Arduino's code. The Arduino will be controlled from the Cloud through the NearBIOS.
Note: The default Agent IP configuration is DHCP. If you want to use static IP Addressing, you should set the STATIC_IP parameter to 1 and configure your IP LAN parameters, in the main sketch (available in Hello_World_Ether v0.5L).
STEP 5 - Verify that your Arduino is UP
In the Device List screen, your Arduino should go Up (green) in a few seconds.

Important: The screen does not refresh in an automatic way, so you should reload it in order to get the device status.
Troubleshooting :(
If your Arduino remains DOWN, make the following verifications:
1- Verify that the green light in the Arduino's Ethernet connector is flashing.
2- Verify that your internet connection if Up (if you can surf by internet).
3- Verify that your Arduino is configured Ok (the 8 character password, the Device_ID and the Arduino's MAC).
4- Reset the Arduino, to ensure that it is properly initialized.
REMEMBER: If you are experimenting random errors with your code (usually on memory exhaustion conditions), verify that the #define parameters DEBUG_DATA, DEBUG_BETA and DEBUG_ERROR (in file NearBusxxx_xxx.cpp) are all set to 0 (in order to deactivate the output debug messages).
STEP 6 - Wire your Arduino
Wire a LED with a current limiter resistor to the Arduino's Pin 3 (NearBus Channel 0).

STEP 7 - Control the LED from the Cloud
a- Select the "CONFIG DEVICE" option in the drop-down menu from the DEVICE LIST screen.

b- Put the Channel 0 in Manual Mode (check de MAN check-box for Channel 0).
c- Control your LED: Change the FUNCTION drop-down menu to UP, and the Arduino's Pin 3 should go UP and the LED will light :).

STEP 8 - RESTful API Example
The following example is intended to show you the easy way in wich the RESTful API works. It shows how to control the LED (Channel_1/pin 3) from your browser, using the address bar as a line command interface (like a traditional OS shell).
To turn the LED on enter the following URL in your browser, replacing the argument's values (user, pass, device ) with your own values:
http://nearbus.net/v1/api_vmcu/NB100001?user=nearbus&pass=1234&service=DIG_OUTPUT&channel=0&value=1&method=POST
To turn the LED off, change the value argument from 1 to 0 as shown bellow:
http://nearbus.net/v1/api_vmcu/NB100001?user=nearbus&pass=1234&service=DIG_OUTPUT&channel=0&value=0&method=POST
As you can see thanks to the RESTful API implementation you will be able to control your devices through a simple web link !!!

Note: Is important to remark that the security point of view, the RESTful API can be as secure as a web bank transaction if it implements the same security systems (SSL, certificates, etc.). This basic example only has demostrative purposes, so it does not implement any strong security level.
STEP 9 - RESTful Javascript Example
The following file shows a Hello World example (a blinking LED) coded in JavaScript. The example (a .html file) runs on the browser and send RESTful calls to the NearHub to turn on and turn off the LED (connected to the Arduino Ethernet board). This example is intended to show you the simplicity and power that RESTful offers in any lenguage.
In order to execute it you should edit it and modify the parameters indicated into the file.
Download: HelloWorld_0v1.rar
REMOTE CONTROL (for mobile devices :)
The following Remote Control HTML example has been designed to be used from mobile devices (Smartphones or Tablets). It will allow you to switch ON and switch OFF up to four power devices.
Download: NearControl_0v1.rar
Mobile Device Interface

IMPORTANT: Because the browsers implement the Same Origin Policy, making calls from your local web page to NearBus server with functions like XMLHttpRequest() will not work.
Testing More Features
If you want to try more features available in the functions drop-down menu please refer to the HELP section for a detailed description of the NearBIOS features.
If you are interested in knowing more about this App Note please contact us at: info@nearbus.net
