App Note 1211 - XMAS Internet Sequencer
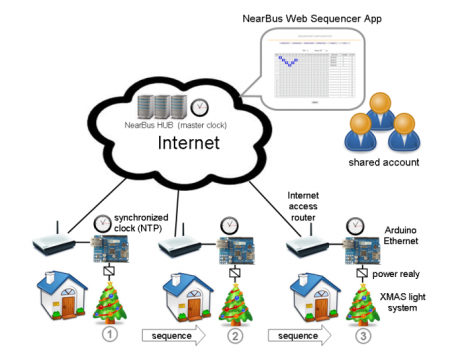
This App Note describes how to implement a large XMAS light sequencer (for a small neighbourhood or across different countries) using an Arduino implementation of NearBus system. This implementation will allow you to manage up to 16 lights from the web with a precision of 100 ms that provides enough capacity to implement powerful light effects at large scale.
The following video shows a implementation with three Arduino platforms (Ethernet) synchronized independently (from a remote NearHub) with a time slot of 250 ms. Because there are 4 lights in this example, two Arduinos uses one channel and the third uses two channels. The lights are switched on or off by a modified plugable outlet (with internal micro-relay)
Contents
- 1 How does it work?
- 2 Remarks
- 3 Implementation Steps
- 4 STEP 1 - Sing Up a new NearBus account
- 5 STEP 2- Download the Agent code library
- 6 STEP 3- Set Up the new devices in the NearBus Data Base
- 7 STEP 4- Update the Agent code in each Arduino platform
- 8 STEP 5- Connect the light system to the Arduino Agent
- 9 STEP 6- Verify that all devices are UP
- 10 STEP 7- Configure the Sequencer Chart
- 11 STEP 8- Start the sequencer system
How does it work?
This implementation allows you to control up to 16 independent light systems connecting each to a different NearBus Agent. The Agents are not linked together, instead they are only linked through Internet to the NearHub. To synchronize each light system the NearBIOS implements a pseudo NTP system that allows to synchronize all the agents with a precision about 100 ms. The Web Interface should be used in shared mode (between multiple users) to simplify the interaction when the light sequence is defined.
Remarks
- This implementation has been designed to be simple to deploy. It only requires an Arduino Ethernet platform and a simple relay electronic driver (to control the power light system).
- This is a DIY project, so we do not sell any of the special components that are shown in this application note.
- This App Note is intended to be used with educational or experimental purposes and should not be used in professional environments.
Implementation Steps
To implement the XMAS Internet sequencer you only need an Arduino Ethernet platform (Arduino Ethernet or Arduino UNO, Leonardo, etc + Ethernet Shield). Additionally to control the power light system you will have to implement the electronic relay driver system.
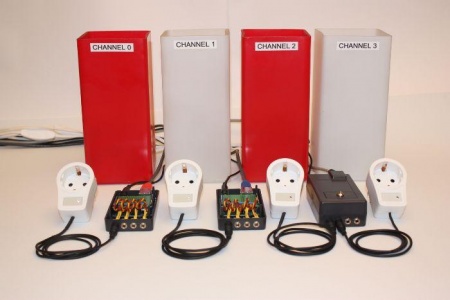
In this picture you can see the power switches, they have been implemented by modifying a simple plugable outlet (with internal micro-relay).
STEP 1 - Sing Up a new NearBus account
Because this specific App usually will require a group of users, we recommend to define a shared account, and manage it between all the users to simplify the configuration process.
STEP 2- Download the Agent code library
Download the Arduino NearBus library from the download menu. Because this is a beta release the only one supported platform is Arduino Ethernet.
STEP 3- Set Up the new devices in the NearBus Data Base
The "New Device" menu will allow you to activate the devices in the NearBus system. When you generate a new device the system will give you a new "device_Id". This device_Id identifies your device in a unique way (like a MAC) so you will need to set this device_Id (and the shared secret) in the Arduino code before uploading it to the board.
STEP 4- Update the Agent code in each Arduino platform
Set up the right "device_Id", "shared_secret", and Ethernet MAC address before uploading the Agent code in each Arduino board.
STEP 5- Connect the light system to the Arduino Agent
This Beta release of NearBIOS supports up to 4 channels on the Arduino agent. For this App you only need to connect the "digital pins" of Arduino. The chart below shows the assigned pin for each channel:
| Channel 0 | Dig_pin 3 |
| Channel 1 | Dig_pin 5 |
| Channel 2 | Dig_pin 6 |
| Channel 3 | Dig_pin 9 |
You should connect so many channels as light systems you want to connect over each Agent (from 1 to 4).
Note: as usual, to control a power light system you need to implement a power driver. The simplest solution is to use an electromechanical relay driven by a small transistor. In the Help section you can find a diagram of this simple circuit.
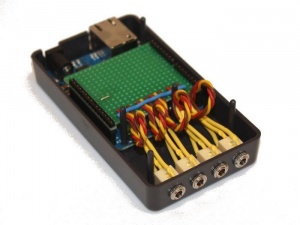
The following picture shows the trivial implementation of a four channel NearBus Agent with Arduino Ethernet (there are no active components in this prototype, it only has four audio jacks directly wired (Vcc, GND, Signal ) to the Arduino board ).
STEP 6- Verify that all devices are UP
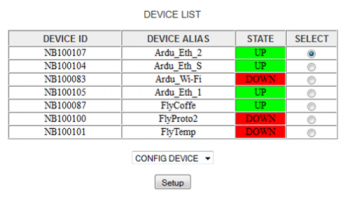
The "device list" menu will show you the device state (UP or DOWN). Be sure that all devices are in UP state.
STEP 7- Configure the Sequencer Chart
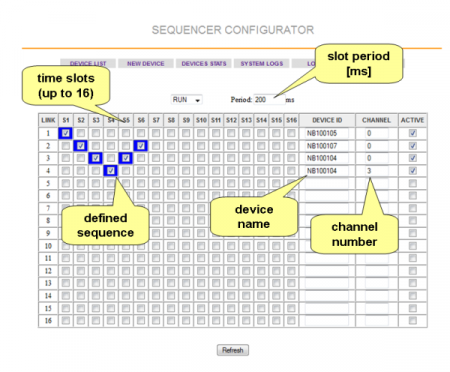
The "Sequencer" menu allows you to configure the desired sequence. You should define the device and the channel that will control the sequenced light. The following screen shot shows the sequencer configuration screen:
STEP 8- Start the sequencer system
Select the RUN option in the configuration screen and refresh it. The system takes a few seconds to be synchronized and fully operative.
For detailed information about how to implement and configure this AppNote, please contact us at: info@nearbus.net
